
If you are looking to scheduling a recurring email in Outlook by itself, give up. Outlook does not have any native functionality to do this.
You will have to, unfortunately, either find a 3rd party application or add on.
However, if you have access to Power Automate you can do it.
Here we are going to do something complicated. We will have to create 4 separate flows as follows.
1. Set up a Recurring Email
2. Check for Replies
3. Send the Reminder Email
4. Reset the checking for replies
It covers a specific situation. Where let’s say for example, you are sending a request for updates at the same time. Then no one replies, you must remind them, but you much rather have that step automated. After the reminds are sent the automation resets. That’s what I’m aiming to do here in this tutorial.
1st Flow: Set up the Recurring Email
- First create a new flow by clicking the “New Flow” button
- From the drop-down menu choose “Automated cloud flow” from
- Click the “Add a trigger” button
- Search for the “Recurrence” trigger which should be under Schedule.
- The Recurrence panel will open and the Parameters section
Interval: Is how many of the frequency you need. For example, if you want bi-weekly, you will need to put 2. Because it is every two weeks.
Frequency: Day, week, month, etc.
Time Zone: Choose your time zone.
On these days: Choose between Monday – Friday
At these hours: 0 – 23, Military time
At these minutes: 0 – 59
At the bottom it will show a preview of how it will run. So, ensure it is correct!
- Then click the plus sign to add an action

- Then find “Send an Email”
 There are couple, but they should all work regardless.
- Another Parameter panel will open. Here is where you put your email. You can put who you want to send it to, subject, body, and etc.
However, to note, you cannot send to a list. To do that you are going to need SharePoint List as a workaround. That’s another tutorial.
Just to be on the cautious side. USE YOUR OWN EMAIL. This way you can test it later and not clog someone else’s inbox.
- Click the “Save” button in the upper right corner.
- Then click the “Test” button in the upper right corner.

- The Test Flow panel will open. Choose to test “Manually”

- Click the “Test” button the bottom, it should have turned blue.
- See if you got the email.
- Go back to the Flow Dashboard, at the bottom you will the run history. It will tell you if it succeeded. If it did, congrats!

2nd Flow: Check for Replies
Before creating the flow, you will need to create a SharePoint list. I called mine “WeeklyCheckinStatus” it doesn’t matter what you call yours.
I created the following columns:
- Title: This is where the email addresses go
- Status: Type is choice (Replied, Not Replied)
- LastReplyDate: Type is Date and Time, check include time, and friendly format.
Now move into Power Automate.
- Again, create a new flow by clicking the “New Flow” button

- Again, from the drop-down menu choose “Automated cloud flow” from

- Again, click the “Add a trigger” button

- This time the trigger is “When a new email arrives (V3)”

- For the parameters, the most important one is the “Subject Filter” make sure you put the same subject line as the recurring email. Ensure that it is UNIQUE and won’t overlap with another email.

- Then click the plus sign to add an action
- Select the “Get Items”

- Fill out the following:
Site Adress: This one is tricky. You can’t just copy the link to the list. You have to find your Share Point List Home link so to speak. It would be something like
https://YOUR COMPANY-my.sharepoint.com/personal/
List Name: If you put your site address in correctly, then a drop down should appear. Allowing you to chose your list.
Filter Query: Type in
Title eq
- Then click the lighting icon

- Then click From. It should be:


- Next create a new action
- In the Condition Parameters
Choose “And” and for the value, select the “fx” which is the function icon
Put
length(body(‘Get_items’)?[‘value’])
then “greater than”
and then the last value as 0

In the True branch, choose the action “Apply to each”
Then in the “Select an output form previous step” field
Again choose the Lighting icon.

Then select “body/value”
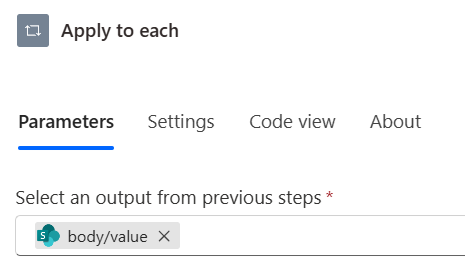
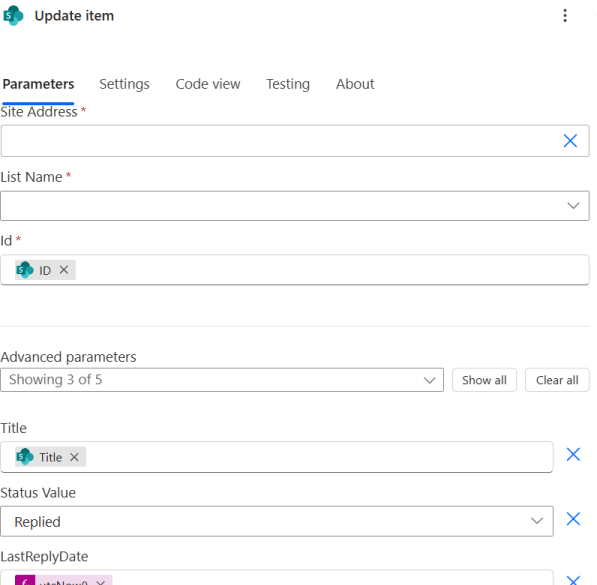
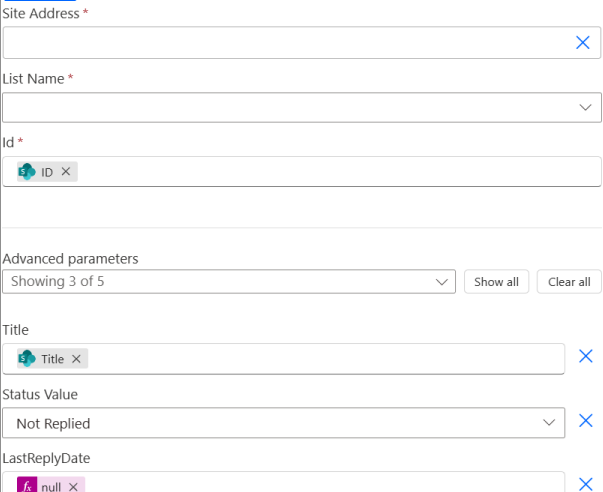
Within Apply to Each, add the action “Update Item”
Within its parameters
Again, put your site address and chose the correct list.
Then put the following:
Id: Click the lighting icon, and choose ID

In the advanced Parameters, choose the following:
Title: Click the lighting icon

and then choose “Title”
Status Value: Put Replied
LastReplyDate: Click the fx icon

and put
utcNow()
In the False Branch, you don’t have to do anything.
Again, saved and then test by replying to the last automated email. I suggest having 2 or emails to test for each scenario.
3rd Flow: Send the Reminder Email
- First create a new flow by clicking the “New Flow” button
- From the drop-down menu choose “Automated cloud flow” from
- Click the “Add a trigger” button
- Search for the “Recurrence” trigger which should be under Schedule.

The Recurrence panel will open and the Parameters section
Interval: Is how many of the frequency you need. For example, if you want bi-weekly, you will need to put 2. Because it is every two weeks.
Frequency: Day, week, month, etc.
Time Zone: Choose your time zone.
On these days: Choose between Monday – Friday
At these hours: 0 – 23, Military time
At these minutes: 0 – 59
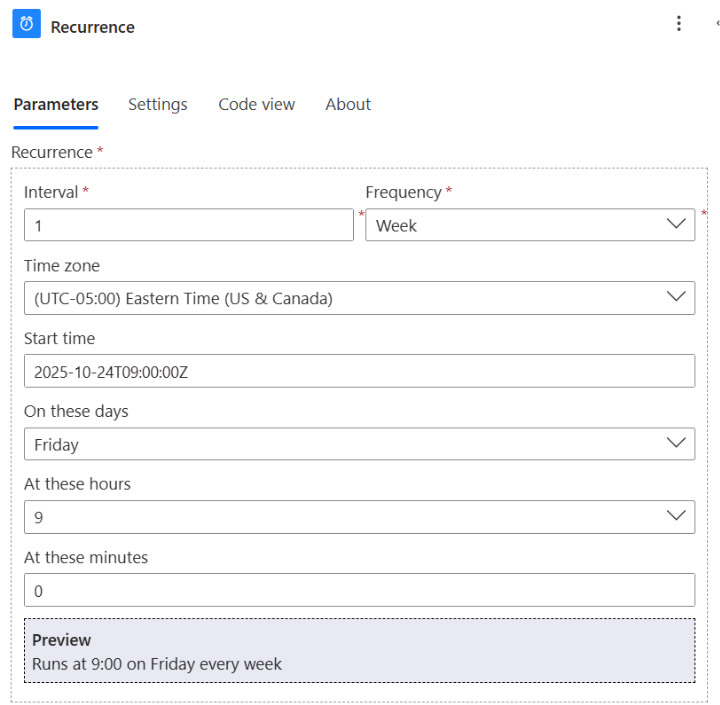
- At the bottom it will show a preview of how it will run. So, ensure it is correct!
- Then click the plus sign to add an action
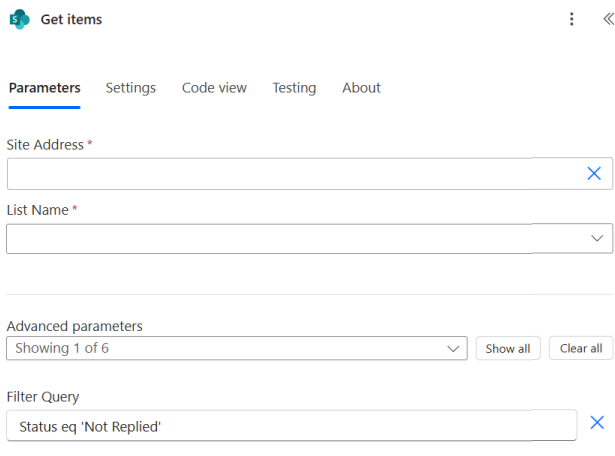
- The one we want is “Get Items”
- In the parameters field, fill out the following:
Site Address: Your Site Address
List Name: And choose your list
In Advance Parameters Choose Filter Query and put Status eq ‘Not Replied’
- Next add another action “Apply to Each”
- Then in the “Select an output from previous steps, click the lighting icon and choose “body/value”

- The next and final action in this flow is “Send an email (V2). Write out your email as mentioned in the previous step.

4th Flow: Reset the checking for replies/SharePoint List
- First create a new flow by clicking the “New Flow” button
- From the drop-down menu choose “Automated cloud flow” from
- Click the “Add a trigger” button
- Search for the “Recurrence” trigger which should be under Schedule.
The Recurrence panel will open and the Parameters section
Interval: Is how many of the frequency you need. For example, if you want to rest to happen the day after, put that.
Frequency: Day, week, month, etc.
Time Zone: Choose your time zone.
On these days: Choose between Monday – Friday
At these hours: 0 – 23, Military time
At these minutes: 0 – 59
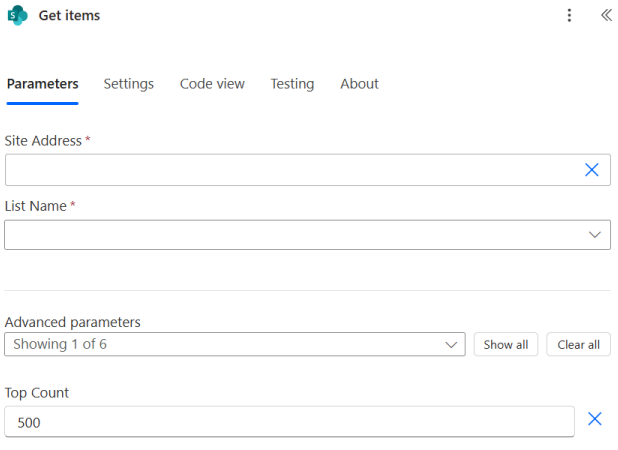
- Add Action “Get Items”
Site Address: Same as before
List Name: Same as before
In Advance Parameters Choose Top Count and put 500. However, you can put whatever number of rows you have. I just put 500.
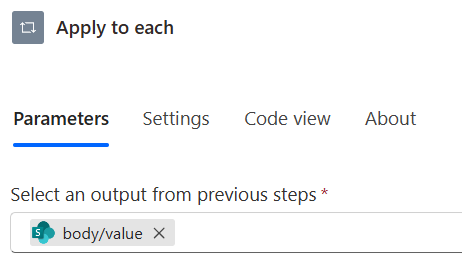
- Add the action “Apply to each”, like before put the “body/value”.
Leave a Reply
You must be logged in to post a comment.