A good practice for your website if it isn’t loading fast is to reduce the size of your image. You can reduce it via free online resources or in Adobe Photoshop.
There are different image types. You will usually see it in the image type at the end of the file name, such as JPG, PNG, GIF, etc. or by right-clicking the file and choosing “Properties.”
First Compress Image
If you type in compress [image extension] into google, you can find plenty of free websites that do this service. Sometimes, there are limits to how many you can compress. Here are my favourite site to use: https://ezgif.com/optimize

You can see there are three image compression options.
The second is to choose the correct format
In terms of which image format is the lightest, WebP is the lightest but not widespread. I prefer PNG for the web, jpg for photos, and gifs for short animations.
The third is to cut up images.
With Photoshop, you can slice images into pieces, which then quickens the load time. Below is a tutorial
This one is a bit more advanced method for optimization.
The Fourth is to reduce the dimensions
Find the maximum size you need for your webpage. Often time the image is way bigger than it needs to be. To reduce the dimensions, you can use any free image editing software.
I usually screenshot what I need, find the dimensions and reduce the image to that size.
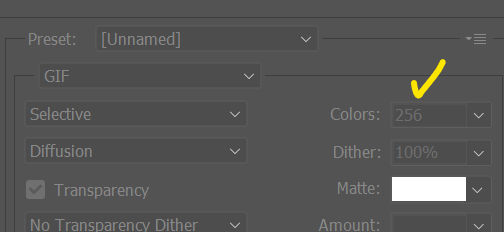
The Fifth is to reduce the number of colours
The fewer colours, the smaller the file. You can do this via photoshop by going to export> Save for Web
You will see on the left-hand side the colour drop-down options. The fewer colours, the smaller the file.
Leave a Reply
You must be logged in to post a comment.