
This tutorial is for SIMS 4, and I learned how to create sims clothing cc by owlplumbob at https://sims4studio.com/thread/7044/finish-marvelous-designer-clothing-tutorial. I felt there was more to add that isn’t covered by many tutorials and wanted to create my guide.
Programs you will need:
Marvellous Designer: Link
Sims4studio: Link
Blender ver 2.78: Link
Blender ver 2.70: Link
An Photo Editing Program. I use Photoshop: Link
The SIMS Game: Link
SECTION 1
You will need to download the SIMS avatar/mannequin to ensure that the clothing is made to fit the EA models. You can download them here: Link.
Once you download it, you will open Marvelous Designer and import the avatar. You do this by going to FILE>OPEN>AVATAR.
Then it is time to create your clothing in Marvelous Designer. Here is a starting tutorial on how to do that.
SECTION 2
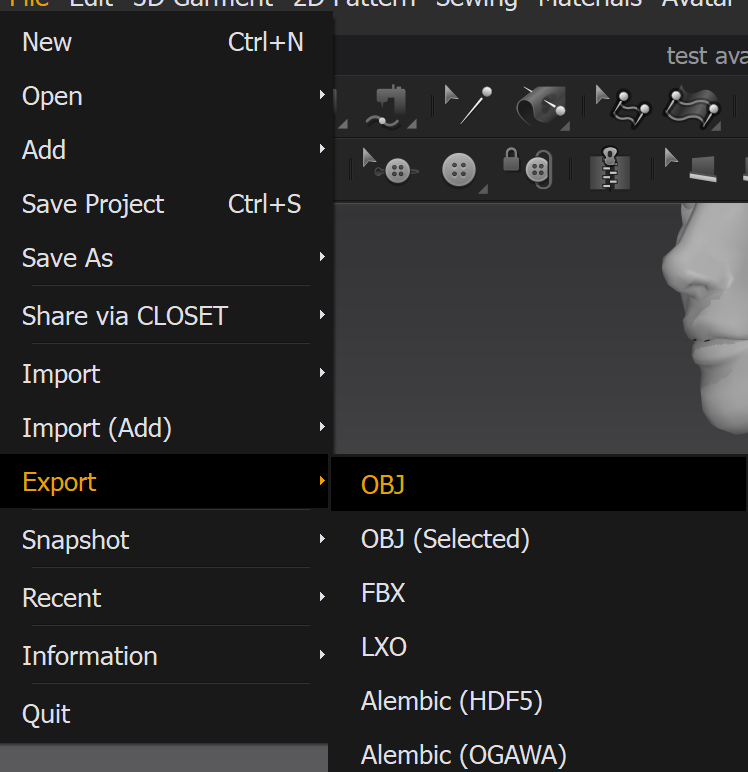
Once you are done, you must export your clothing as an OBJ file. To do this, go to FILE>EXPORT>OBJ
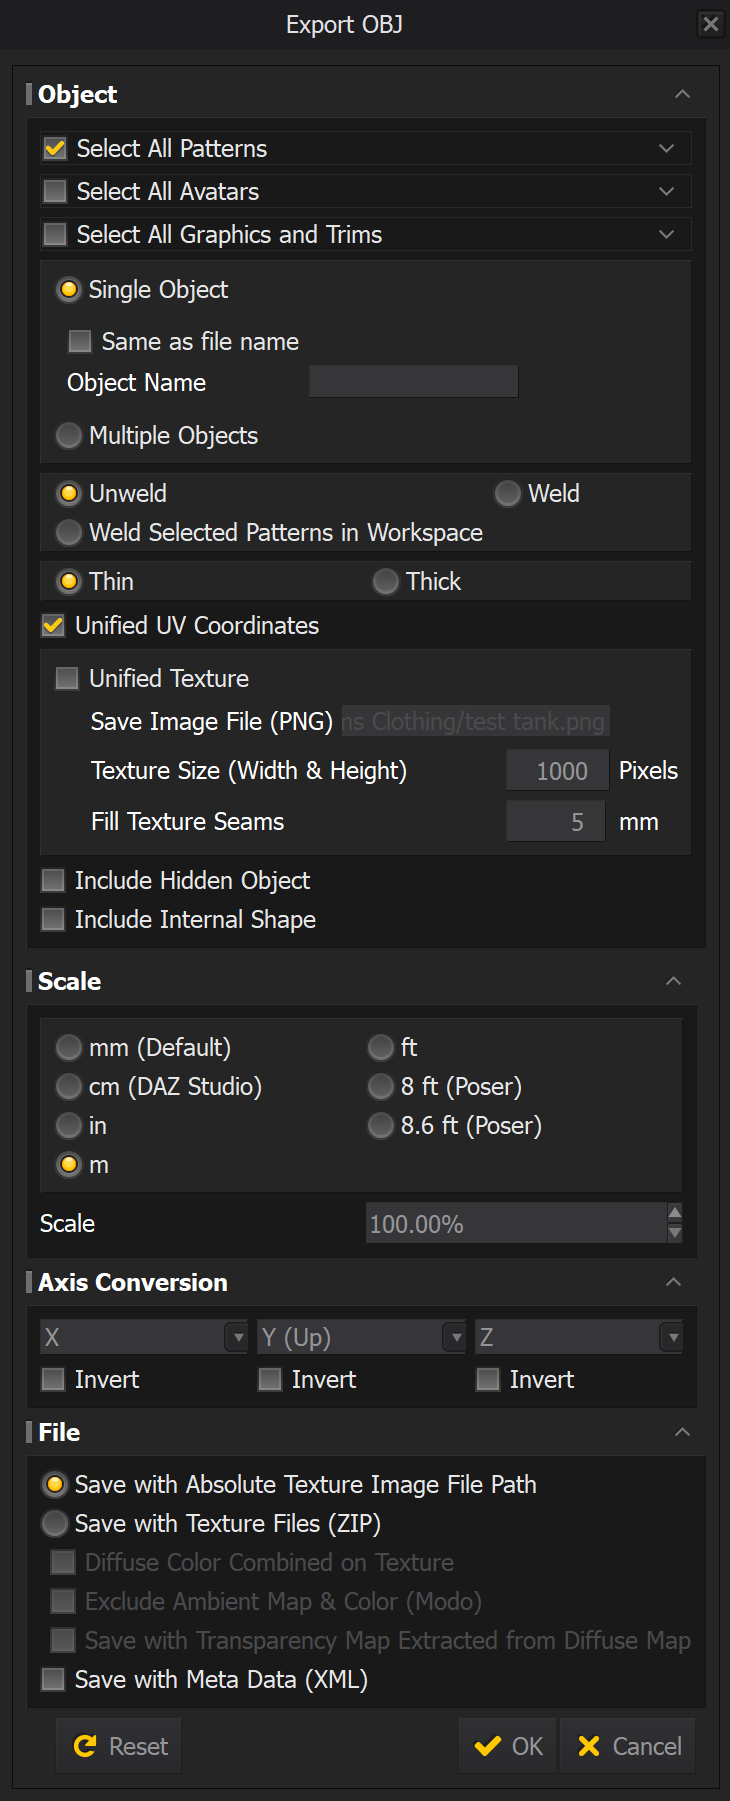
Choose a name, and a window will pop. Make sure you select these settings:
SECTION 3
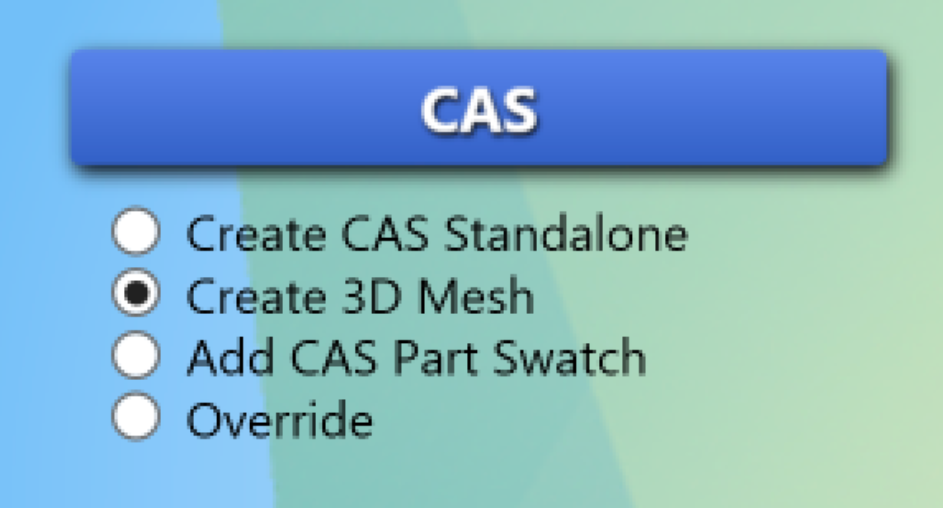
Here you will start getting the base to prepare for editing in Blender. Open Sims4studio, and under the CAS section, choose “Create 3D Mesh” and then click the blue “CAS” button.
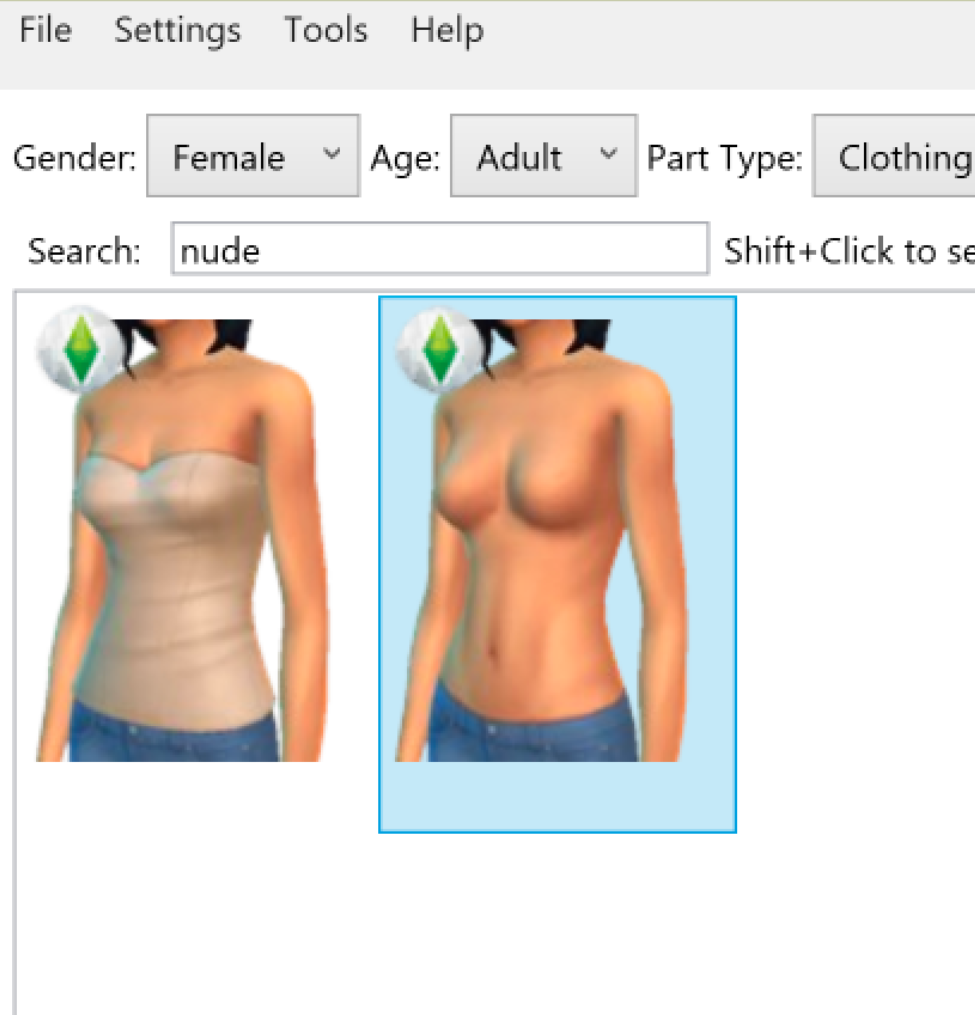
Generally, you would search for nude tops and bottoms. You would then select the SIMS model you are designing for. However, in the case of a complete body outfit, like a dress, etc. You need to export the top and bottom and combine them.
To export the body parts. Please select the item and create a package for it. Then in the tabs beside the model picture. Select export mesh. Save it. Do the same for the bottom.

Open Blender 2.78 and open the top mesh when that is done. Go to FILE>APPEND, and then choose the bottom. Then click OBJECT>S4STUDIO_MESH_1

In the layers panel, select the two meshes. Then click JOIN under the tools section.


SAVE YOUR MESH. Constant saving is also good practice my opinion (flashbacks to school assignments being lost). Now you got your base to work with for your whole body clothing. These joining steps don’t apply if you have a top or bottom. You would need to export the nude top or bottom. Anyways, ONWARD.
SECTION 4
This is where you will start modifying the clothing you’ve made to fit and work on the “mannequin/base.”
Ensure that the “mannequin/base” is open. Go to FILE>IMPORT>WAVEFRONT(.OBJ) and select the marvelous designer mesh you created.

It should look something like this. Here you can see there are holes in the mesh. I tried my best not to have these holes in marvelous designer. Sometimes you can freeze fabric and change settings. However, it sometimes doesn’t work (I will make another tutorial on using MD). It is a shame that I couldn’t fix it in MD, but that doesn’t mean you won’t be able to fix it in Blender. Here is how I fix those little holes.

Near the bottom, go into Edit mode.

When you are in edit mode, you can see all the faces, points, and edges of your clothing. There are three options near the “modes” menu. The first is to edit points, the second is to edit edges, and the third is faces. The video below is a good tutorial explaining how to manipulate it.

Essentially, you don’t want any skin showing through the clothing. Once that is done, you can close the “holes” in your clothing. I’ve seen tutorials skip this step. It is optional, but I think it makes your clothing look better.
Here you can see the opening in the sleeves, which I refer to as a hole. You can see up into the arm.

Here it is closed. You can see the difference. Now you can’t see up the sleeve. It is a matter of preference.

I like it closed, and here is how I do it.
Again, ensure you are in edit mode and open the UV window. By default, it should be on your left side. You should see the icon that I circled in red near the button. Click it. It will ensure whatever you do with the UV is synced with your mesh.

I then select the vertex mode right next to it. I then select the points of edges of the opening.

Then I move the mesh view where I can see the mesh of my clothing. I would hide the layer with the “nude/base” mesh in the layer menu. This way, you can see the holes better.

Once it is off, I then go to the mesh. The points should be highlighted in your clothing mesh. I press “E” and “S.” E is for extruding your mesh to add additional faces. S is for scale to help close it. It should be like something below.

Don’t click out. With everything selected, press the space bar and look for “merge.” A pop-up should appear when you click “Merge at the center.”

The hole will close!

Next, select all the polygons. Then click the space bar again, and type in “edge split.” This will flatten the polygons so you won’t get these weird gray bumps.
Then you select all the polygons again. Go to the Shading/UVs section, and go down to UVs. Click Unwrap and select project from view.

It will then appear in the UV section to the left. Do this for all the holes.

SECTION 5: UV
Next, you will need to look for a reference in Sims4Studio. The purpose is to transfer the data from a premade sims outfit onto your own so that it will work in the SIMS game. Find the one that looks closest to yours and covers the clothing. I would recommend trying the first look in the base game. If you can’t find one similar, then go onto other packs.
To do this, open Sims4studio. The process is similar to exporting the nude blender file. Once you get the file, open your project file. Then go to

Then go into Object, and you will see these files that say s4studio_mesh_X. With X being any number. I have four, but it ranges from 1-6. Select all and then append.

Then click all the layers of the reference and then join them.
Click the data mode. It’s the triangle button. MAKE SURE YOU CLICK THE MESH YOU CREATED IN MARVELOUS DESIGNER.

Go to the UV section and open it up. You will see UVMap.

Double click the UVMap and rename it to “uv_0”. Then click the “+” sign on the right to add the second map and rename it to “uv_1”.

Again stay on your mesh layer, stay in “uv_1”, then click the modify tool. It looks like a wrench. Also, go into object mode.

Then go to the drop-down menu where it says “Add Modifier” and choose “Data Transfer.”

These are the following settings that need to be appended. The source object will be your reference. I renamed mine to reference to make it easier to find. Also, click “UVs.” It will turn blue if you click it.
Go back into Edit mode and check uv_1. It should look stretched like this if it does great! Just hide the reference. It will be used later.

Now click into the “uv_0” We need to modify the UV a bit to prepare it for placement by going into the face mode on your UV side like this.

Select all the mesh by either clicking A or by selecting manually. Then click the picture icon next to “BaseTexture” Open the window and click the first one. It will be given a map to help you know where to place the UV.

However, I don’t particularly like that image with the skin. It makes me uncomfortable. So I like this one better. There are similar maps for male SIMS. You can find them on sims4studio.

You can replace it by going to image>Open Image and choosing the other UV Map guide.

Now we will fix the stretched UV. With everything, select “S” for scale and then “Y” to let it know you want to stretch it on the Y-Axis. It was resized to where you want it. Then place the UV away from grids. Like this:

Now merge the “nude” and your design mesh. When you merge them, the UVs get merged too. The goal is to have your pieces of clothing placed in the correct area marked on the UV map. However, the places where you put your clothing already have something there. As you can see:

The next step is to remove parts of the UV and put yours there. To do that, press “A” and select everything. Next, look in the 3D viewer; you can see all the faces selected. Now we are going only to delete the faces we can’t see. This gives space and helps reduce the size of your file.

With everything selected, we will deselect the skin we can see. To do this, press “C” To get the brush and middle select on the mouse. It should be the wheel. Start going around the model and deselect until you are complete. MAKE SURE YOU DESELECT YOUR OUTFIT TOO.
Then go to the tool menu and select: remove > faces

Now you can rearrange your UV into the correct places. To do this, select the faces, click “G” to move, “R” to rotate, and “S” to scale. Finally, “A” to deselect. Here you can see I placed them best as I could. The bottom right corner is sort of a free for all. I placed misc stuff there.

Select your clothing UV in the bottom left corner of the UV window. Click – Image > New image

Then a window will pop up and change it to 2048 px for the height.

Next, on the right-hand side, there is a camera icon. Click it, and these settings should show up. The Margin is the only one I would change to 4 px. Then click “Bake.”

Once it is done baking, go to the image section again. Click – Image > Save As Image.

SECTION 6: ADDING WEIGHTS
Open Blender 7.0 and open the file.
Go into the solid view by clicking the white circle at the bottom and clicking “Solid.”
Go into Weight Paint mode by clicking next to it.
Also, ensure you are selecting your UV_1.

Your model should look like they have been painted blue like this:

Turn your reference layer back on. If you deleted it by accident, append it again.
HERE IS WHERE YOU TRANSFER THE WEIGHTS. Click the reference layer, press shift, and then click your outfit layer. Then click the “Transfer Weights” button in the panel.
You can check if you did it correctly by turning off the reference layer. Then going into the UV_1 panel and you should see something similar. Click through them, and you should show them brightly on your model like below. It lets you know that weight has been successfully transferred!


SECTION 7: VERTEX PAINT
Next, go to the “Vertex Paint” Mode at the bottom.

Your mesh should be bright green, and the clothes should be white.
Now, go to the left; you should see a colour wheel with a white rectangle below it. Click the white rectangle.

A panel will pop up. Click the eye dropper tool and select the green you see on your model.

Then go to the bottom and select Paint>Set Vertex Colors.
Your entire mesh should be that green colour.

You can now finally delete your reference layer!
SECTION 8: LABELING YOUR MESH
Go to this menu again, and choose the sun, ball and cylinder icon.

You should see this menu below. Put the same settings under “S4Studio CAS Tools”.
Type: GEOM
Cut: 0000

Of course, SAVE YOUR WORK.
SECTION 9: IMPORTING IN SIMS4STUDIO
Open Sims 4 Studio and open the package you started with, which should be the nude/naked sims.
In the mesh tab, click “Import Mesh” and choose the clothing that you’ve worked with.

Once it is done importing, you will see it in the preview window.

Then go to Texture Tab. Choose Import, and remember the image you save of your UV from before? I edited mine a bit—Import that.

Ta-da, you should see the pattern on the model.

Then go to the categories section, and choose the appropriate filters.

Save the package, and then put it in your game’s MODS folder.
You should see a mods list pop up when you open your game.
Put your clothes on your sims and test it! Go to Content filter and choose custom content. Stretch the clothing, spin it around etc.


YOU’RE DONE! GREAT JOB!
Here are Youtube tutorials on the overall process of creating SIMS Clothing that it recommends.
There is still so much more to learn, but this was a beginner lesson. There is still learning about LO1, etc. I’ll make a tutorial on those later!
Good luck on your journey into 3D clothing!
Leave a Reply
You must be logged in to post a comment.