When I first started my journey in creating CC (Custom Content), it was daunting. I will admit it is tedious, but it is doable. I find the best way is to start small and work your way up to a more complicated cc.
Start with Recolouring
When you begin, the easiest way to dip your toes in creating SIMS CC is to recolour what has already been made by Maxis. This will help you become familiar with Sims4studio, where cc goes, and photoshop. I am assuming the game has already been downloaded on your computer.
Step One: Download Sims4Studio
To start with recolouring, you will need Sims4Studio and an Image editing program like Photoshop (I will be using Adobe Photoshop). GIMP is a free online tool you can use.
The download is hosted on https://sims4studio.com/. It is a place where SIMS Creator can come and chat with each other on the forum. It is an accommodating place. Their users have years of experience in creating SIMS CC. You can look through the forums for answers to common problems. When you have downloaded it, please open it and configure the paths by opening up settings in the top menu.
Step Two: Create a new Project
Now, in Sims4Studio, choose the option under CAS to create 3D Mesh, and then click the button “CAS.”
It will then open up into a catalogue, where you can choose what item of clothing you want to modify and then click next. It will help you to save and create a project name. This will create a package that the program that will collect all the information so you can insert it into the game.
Step 3: Export the Texture
Once you save it will then open into this window. Here you will export the texture of the clothing to modify it. Go to the texture section. This is where you see the options “Diffuse, Shadow, Specular, Normal, and Emission.” For now, we will focus on Diffuse. Click that option and then click the Green “Export Button.” Save it as whatever you want.
Step 4: Modify the Texture in the Image Editing Software
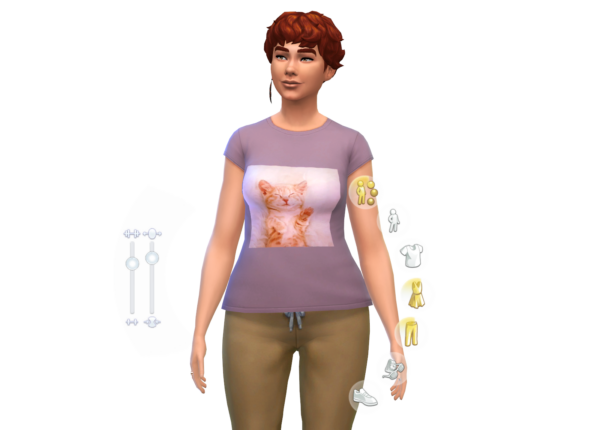
Whatever your choice of imaging editing, open up the texture in it. For mine, I chose this plain t-shirt. I am going to put an image on it for fun! There are many tutorials on youtube on how to edit images. When you are finished, save the file!
Step 5: Import the new texture back into your project/package
Go back to your project/package, and in the texture section, click the blue “Import” button. A window will popup, and choose the texture you edit. It will now appear in the studio window and on the screen. Click save when you are done.
Step 6: Put the package in the mod folder
There are a lot of tutorials on how to add cc on youtube. I put one below. Generally, put the package file into the mod folder within your game. It will inform you of the added cc when you start it up.
And that’s it! When you go into creating a sim, you can filter the content by custom content, and it will show up.

Leave a Reply
You must be logged in to post a comment.